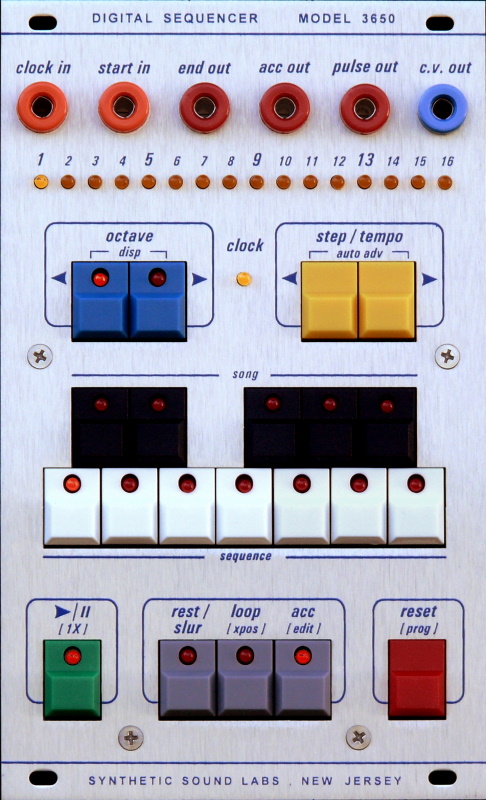
We have collaborated with our friends at Division-6 to bring you this handy 3650 Digital Sequencer in Buchla format.
The 3650 gives you standard CV and pulse out, plus an ACC out (Accent? Accessory?) Use the ACC output to open up a filter, enable a glide, trigger a drum, or whatever you can think of.
It has its own internal clock to get you up and running in a hurry, but you can connect an external clock if you need greater control of tempo or want to sync with other devices.
The module can store up to 5 songs of 16 sequences each, and 7 sequences of up to 16 steps each. Wow!
Inputs
CLOCK IN (External clock input)
START IN (Expansion input; Starts sequencer back at step 1. Use for daisy-chaining multiple units)
Outputs
END OUT (Sends pulse when sequencer goes past last step. Use for daisy-chaining multiple units)
ACC OUT (Can be programmed on or off in each sequence step)
PULSE OUT
CV OUT
Features
CV OUT covers 5 octaves
Sequences can be set to any length up to 16 steps by using LOOP feature
Setting a step to REST holds previous pitch and doesn’t fire PULSE out
Setting a step to SLUR changes to the new CV and doesn’t fire the PULSE out
In Standby mode, sequencer can be used as a tiny keyboard without altering programmed sequences
7 sequence memories with up to 16 steps per sequence.
5 song memories string up to 16 sequences together
Live transpose
Much more…
Cascading
You can also cascade multiple 3650’s to create longer, more complex and syncopated patterns. Why would you need more than one sequencer?
More sequencers = more steps
Use one for playing notes and the other for transposing those notes
Can be used as a clock divider
Run in parallel for multiple CVs / triggers
The two sequencers will run completely independently, or you can daisy-chain them using the START IN / END OUT jacks to create sequences of any length.
- CV Out - 0 to ~6V
- Pulse Out - 0 to ~5V
- Accent Out - 0 to ~5V
- End Out - 0 to ~5V
Power
- Current draw: +15V @ 16 ma
- 200e standard connector with flying leads
Size
Width - 200e standard
Depth - 1.25" behind panel
Demo Videos
Product Documentation
3650 Digital Sequencer
The SSL 3650 Digital Sequencer is a very flexible and approachable Buchla format sequencer. You can easily start out with the basics without being intimidated, and then begin to explore its many nuances and features as you learn the power of the 3650’s modes.
Many of the buttons on the 3650 have multiple functions and we have tried extremely hard to provide maximum flexibility, while avoiding “menu-diving” syndrome.
Features
CV OUT covers 5 octaves
Sequences can be set to any length up to 16 steps by using LOOP feature
Setting a step to REST holds previous pitch and doesn’t fire GATE
In Standby mode, sequencer can be used as a tiny keyboard without altering programmed sequences
7 sequence memories with up to 16 steps per sequence.
5 song memories string up to 16 sequences together
Live transpose
Much more…
Inputs
CLOCK IN (External clock input)
START IN (Expansion input; Starts sequencer back at step 1. Use for daisy-chaining multiple units)
Outputs
END OUT (Sends pulse when sequencer goes past last step. Use for daisy-chaining multiple units)
ACC OUT (Can be programmed on or off in each sequence step)
PULSE OUT
CV OUT
PROGRAMMING
Programming is done while one of the STEP LEDs is ON (not Ready mode – BLINKING) and the sequencer is not running. You can enter Program mode by pressing RESET a second time, or pausing a sequence with the RUN button. Use the STEP LEFT and STEP RIGHT buttons to pick which step you want to program, then press the note you want that step to play. The new note is automatically stored in memory.
STEP LEDs
The row of 16 LEDs along the top are referred to as STEP LEDs, and have the following states:
BLINK: Ready Mode – Starts on selected step. Can play keyboard live.
ON (Steady): Program Mode – Any notes you push will get saved in the selected step.
SEQUENCER RANGE / OCTAVES
The 3650 covers 5 octaves, so you can use the OCTAVE UP and OCTAVE DOWN buttons to transpose the keyboard / sequence up and down. The OCTAVE UP and OCTAVE DOWN LEDs indicate the current keyboard octave. Note that Buchla synths use 1.2 volts per octave.
Down ON: -2 Octaves (0V to <1.2V)
Down FLICKER: -1 Octave (1.2V to <2.4V)
Both OFF: Middle Octave (2.4V to <3.6V)
Up FLICKER: +1 Octave (3.6V to <4.8V)
Up ON: +2 Octaves (4.8V to <6V)
REST, LOOP & ACC
In addition to standard notes, you can also program a REST, LOOP or ACC into a step:
REST: Replaces the selected note. A REST step holds the previous note and does not fire the gate.
LOOP: Replaces the selected note. A LOOP step sets the sequence back to step 1. You can use this to create any length sequence you want. For example, if you only want steps 1-13 in your sequence, you will make step 14 a LOOP step.
ACC: In addition to a note, rest or loop, the handy and flexible ACC (accessory) output can be programmed into any step. Use the ACC output to trigger other sequencers, envelopes, or anything else your imagination comes up with. The ACC button toggles it on and off.
RESET / PROG Button
The RESET button has several additional functions. It is used in conjunction with some of the other buttons on the sequencer to enable and disable various modes and is indicated by square brackets around the text.
ACC OUT
The ACC (ACCessory / ACCent) output can be programmed into each step. There are 3 on modes to choose from:
On (Stays on for entire duration of step and does not drop before the next step)
On w/ Drop (Stays on for most of step, but drops briefly before the next step)
Gate Follow (Timing follows gate timing for the step)
When programming a step, each press of the ACC button cycles to the next mode. The ACC LED will flash to let you know what mode you have set:
On (LED stays on)
On w/ Drop (LED flashes once then stays on)
Gate Follow (LED flashes twice then stays on)
Off (LED turns off)
PLAYING SEQUENCES
Push RUN to start playing a sequence. The RUN LED will turn ON. Pressing RUN again will pause the sequence at the current step and the RUN LED will turn OFF. The sequencer steps can be programmed while paused.
Press RESET to stop the sequence, go to step 1, and enter Ready mode. The STEP LED will BLINK to let you know that you are in Ready mode. Now when you press RUN again, the sequencer will play starting at step 1 on the next clock pulse.
To start on a different step, use the STEP LEFT and STEP RIGHT buttons to pick a different one.
While in Ready mode, you can use the note/keyboard buttons to manually play tunes without changing the sequence stored in memory. Gate timing will follow your button presses.
CLOCK (Internal / External)
The 3650 includes a handy (but somewhat limited) internal clock, which is activated when the sequencer is first powered on, or after a soft-reset. For greatest flexibility, you may wish to consider using an external clock via the CLOCK IN jack.
When an external clock pulse is received, the internal clock is automatically disabled. To reactivate the internal clock, press and hold the RESET button for about 2 seconds (this soft-resets the sequencer).
CLOCK TEMPO (Internal)
The STEP buttons increase and decrease the internal clock speed while a sequencer is running. Internal clock tempos are approximate:
BPM
10
25
50
70
80
90
100
110
120
130
140
150
160
170
180
190
200
210
220
230
240
250
275
300
400
500
600
700
1000
2000
4000
8000
SONGS and SEQUENCES
Purpose
The 3650 has 7 sequence and 5 song memories available. Songs can contain up to 16 sequences in any order. Each song step contains one sequence.
Default
Disabled / Off
Operation
To enter the Song / Sequence Selection Mode, press and release both the OCTAVE UP and OCTAVE DOWN buttons [DISP] at the same time. Pressing this button combination again toggles back to the normal note select mode.
Selecting a Sequence
The 3650 has 7 sequence memories available. If the entire row of white keys is lit or flickering, you are in SEQUENCE mode. The steady LED indicates the currently selected sequence. Whichever sequence you have selected is the one you are modifying when you enter PROGRAM mode (steady STEP LED. The selected sequence will play to the end then loop back to the beginning.
To select a different sequence, press the white note key corresponding to the sequence you want to select. If the sequencer is running, the newly selected sequence LED will flash until the sequencer reaches the end of the current sequence (or on the next clock; see CHANGE ON CLOCK mode), and will then switch to the new sequence.
Another way to select a sequence, even while the display is in another mode, is to hold down the RESET/PROG button then press the desired sequence button. The display will automatically change to SONG/SEQUENCE SELECT mode.
Selecting a Song
The 3650 has 5 song memories available, which can be used to string together up to 16 sequences in any order. If the entire row of black keys is lit or flickering, you are in SONG mode. The steady LED indicates the currently selected song.
Each song step contains one sequence. When running and the current sequence has completed, the sequencer will advance to the next song step and play the sequence it contains.
To select a song (and switch to SONG mode), press the black note key that corresponds to the song you want to play. If the sequencer is running, the newly selected song LED will flash until the sequencer reaches the end of all the sequences in the current song (or on the next clock; see CHANGE ON CLOCK mode), then it will switch to the new song.
Another way to select a song, even while the display is in another mode, is to hold down the PROG/RESET button then press the desired song button. The display will automatically change to SONG/SEQUENCE SELECT mode.
Programming a Song
Each step in a song contains a sequence. To program sequences into song steps, first make sure the keyboard display is in SONG/SEQUENCE SELECT mode (press OCTAVE UP and OCTAVE DOWN at the same time if it’s not). Press one of the black keys to select the song you want to work on.
Press PROG/RESET until the STEP LED is steady; you are now in program mode.
Press the white key that corresponds to the sequence you want to store in the current song step. The white key LED corresponding to the selected step will light.
Press the STEP UP to advance to the next song step (or STEP DOWN to go back) and select the desired sequence for that step. Continue to program sequences into steps until they’re all programmed.
If you do not want to use all 16 steps in your song, you can use the LOOP button to make the step after the end of your song a LOOP step. For example, if you only want 4 sequences to play in your song, program a LOOP into step 5. When running, the sequencer will bounce off of step 5 and loop back to the first step of the sequence programmed into the first step of your song.
Copying a Song or Sequence
When programming songs or sequences, sometimes you might want to copy an existing one so you can modify it instead of starting over from scratch for each one. To do this, first make sure the keyboard display is in SONG/SEQUENCE SELECT mode. Press and hold the song or sequence you want to copy from, then press and hold the song or sequence you want to copy to. Hold the two buttons for about 1 second; the note LEDs will flash to let you know when the copy has been performed.
The copy always goes from the FIRST -> SECOND button you press!
You can’t copy songs to sequences or sequences to songs
Clearing a Song or Sequence
All the songs and sequences in the sequencer always exist, so generally if you want to wipe out an existing song or sequence you can just modify them or program something new over the top of them. If you do want to “clear” a memory, however, you can. Clearing a sequence sets all the steps to the lowest note. Clearing a song sets all the steps to sequence 1.
To do this, first make sure the keyboard display is in SONG/SEQUENCE SELECT mode. Press and hold the song or sequence you want to clear, then press and hold the RESET button. Hold the buttons for about 1 second; the note LEDs will flash to let you know that the song or sequence has been cleared.
REST / SLUR
When the sequencer gets to a REST step, it keeps the CV OUT the same and doesn’t fire the gate. You can also make a step a SLUR, where it changes the CV OUT to a new note but still doesn’t fire the gate.
To program a SLUR on a step, hold down the REST button, then press the desired NOTE button for that step. Both the REST and NOTE LEDs will light.
Pulse Out Timing
When you first program a note into a step, the gate timing is set to the default Timing mode (1) where the gate follows the timing / width of the clock. You can also choose from 15 other gate timings, including ratchets:
Follow (default)
1/4
1/3
1/2
2/3
3/4
Full (almost- gate will still drop briefly before next step)
Second 1/4
Third 1/4
Fourth 1/4
Second 1/3
Third 1/3
Second 1/2
Double (ratchet!)
Triple (ratchet!)
Quadruple (ratchet!)
To select one of the gate timings, first select the desired step using the STEP buttons, then select a note. By default, Timing mode 1 “Follow” is selected for that note. Now each time you press the same note, the next gate timing will be selected. The current timing number will be shown briefly on the STEP LEDs as each new timing is selected. The PULSE OUT will also do its best to follow the selected gate timing for you.
All gate timing modes except Mode 1 work by dividing the incoming clock signal then calculating the needed timings. This works best with steady clocks. Mode 1 is usually best to use for rapidly changing clock rates.
[1X] MODE
Purpose:
Normally, when [1X] mode is disabled, and the playing a sequence reaches stage #16 (or whichever LOOP step you have set), it will loop back to step #1 and begin playing the sequence again.
Enabling 1X mode is useful when you are cascading multiple sequencers for example, as explained under EXPANSION (below).
Default:
1X mode is disabled by default.
Operation: Toggle (2 states) – Hold PROG/RESET down and tap the RUN button. The RUN LED will flicker briefly for disabled and blink twice for enabled.
EXPANSION (Multiple Sequencers)
Normally, the 3650 will automatically loop back to step #1 at the end of the sequence – either step #16, or wherever you have manually set a LOOP step.
The START IN and END OUT jacks can be used to daisy-chain multiple 3650 sequencers together, fire events on other modules, or reset the 3650 to step #1.
START IN: A gate pulse into this jack resets the sequencer to step #1. It also puts it in run mode if it is not already.
END OUT: Sends a gate pulse when a running sequence drops off the end (goes past 16 or hits a LOOP step).
Run two sequencers in series: To make a 32-step sequence, connect END OUT of Sequencer 1 to START IN of Sequencer 2, and END OUT of Sequencer 2 to START IN of Sequencer 1. Of course, if you have more sequencers (or even other devices), you can daisy-chain as many as you want. You will also need to provide a common clock pulse to the CLOCK IN of all sequencers in the chain.
AUTO ADVANCE
Purpose
Allows you to just play your sequence into the sequencer without having to press STEP UP in between each step, making initial programming of a sequence easier.
Default
Disabled / Off
Operation
When enabled and you are programming a sequence, entering a NOTE or REST or LOOP into a step will automatically advance to the next step.
To toggle AUTO ADVANCE mode, press and release both yellow STEP / TEMPO [AUTO ADV] buttons. The STEP #16 LED will blink twice when enabled and flicker when disabled.
Important Notes:
Gate timing selection, SLURs, and ACC mode selection are not available in AUTO ADVANCE mode. You can enter in the basic structure / notes of your sequence, then go back in normal PROGRAM mode and tweak the timings, etc.
AUTO ADVANCE mode will stay enabled until the next time you put the sequencer in RUN mode, at which time it will disable itself. That is unless you enable…
PERSISTENT AUTO ADVANCE MODE
Purpose
To ensure that AUTO ADVANCE mode stays turned on until you manually turn it off (even if you press RUN)
Default
Disabled / Off
Operation
To enable PERSISTENT AUTO ADVANCE MODE, press and hold PROG/RESET then press STEP DOWN/AUTO ADV, and hold both buttons for 1 second. The STEP 16 LED will blink twice when enabled and flicker once briefly when disabled.
LIVE TRANSPOSE
Purpose
Transpose entire song / sequence up or down using the note keys. When this mode is enabled and the sequencer is running (and not displaying SONG/SEQUENCE SELECT), you can use the note keys to temporarily transpose your entire sequence up or down.
Default
Disabled / Off
Operation
Hold down the PROG/RESET button, then tap the LOOP/[XPOS] button to cycle through the different LIVE TRANSPOSE modes:
On: Root key at bottom (C note) of keyboard
On: Root key in center of (F note) keyboard
On: Root key at top (B note) of keyboard
Off: Disabled
The LOOP LED will flash twice for each ON mode, along with the selected root key, and will flicker when LIVE TRANSPOSE mode has been turned off.
When LIVE TRANSPOSE is ON, instead of the usual current-note display, the NOTE and OCTAVE LEDs will display the transpose status:
Steady NOTE LED: Root key
Blinking NOTE LED: Currently selected transpose amount
Flickering NOTE LED: All the notes in between
Pressing the root key (indicated by a steady NOTE LED), will set the transpose amount to 0, and your sequence will play just as it is programmed.
By pressing a NOTE key above the root key, the CV OUT will be transposed up by that number of steps. For example, if the root key is the F in the middle of the keyboard and you press the G key, then your sequence will be temporarily transposed up 1 step (2 semitones). The LED corresponding to the key you selected will blink to let you know at a glance how much you are transposing and in which direction. All the LEDs in between the root key and your selected key will flicker dimly.
Pressing a NOTE key that is below the root key, the CV OUT will be transposed down by however many steps the key you pressed is below the root key.
To transpose farther than what is currently displayed on the keyboard, you can use the OCTAVE UP and OCTAVE DOWN buttons to shift the keyboard octave. Select the octave you want, then press the key for the amount you want to transpose. You can also instantly jump to a transpose key in another octave (one up or one down) by holding one of the OCTAVE buttons and pressing the desired key.
There are a few other buttons that work in LIVE TRANSPOSE mode that might come in handy during a live performance:
REST: Makes the next step a REST (one time only)
LOOP: Loops back to the beginning of the song or sequence on the next step (one time only)
ACC: Turns on ACC OUT on the next step (one time only)
Important Notes:
You cannot transpose past the range of the CV output. For example, if you have a note in your sequence that is the lowest C, then you try to transpose down from there, the output isn’t going to get any lower. For maximum transposeability, we recommend programming your sequences in the middle octaves.
Also, if you use the RUN button to pause the sequencer then start it again, whatever transpose amount you set will be retained. If you press RESET to go back to the beginning of the sequence, then the transpose amount will be cleared.
LIVE EDIT
Normally when a sequence is running, the NOTE buttons do not do anything. With LIVE EDIT mode enabled, you can use the NOTE buttons to program your sequence on the fly.
Purpose
Entering notes into a running sequence.
Default
Disabled / Off
Operation
To enable or disable LIVE EDIT mode, hold PROG/RESET down and tap the ACC/[EDIT] button. The ACC LED will blink twice for enabled and flicker for disabled.
When the sequencer is running, pressing a NOTE button will program that note into the current step. You can also program a REST or a LOOP during live editing.
Important Notes:
The changes you make using LIVE EDIT are not written to the sequencer’s non-volatile memory until you pause/stop the sequencer. Do not disconnect power while it’s running, or you’ll lose your changes! (This does not apply to using the normal PROGRAM mode; those changes are saved immediately.)
RUN / RESET MODE
This is another mode you can enable for START IN. When enabled, the sequencer starts when START IN goes high and resets when it goes low.
Purpose
Use this mode to both start and stop the sequencer or start it from a step other than 1 (select your starting step with the STEP buttons, then send a gate pulse to START IN).
Default
Disabled / Off
Operation
To toggle this mode, press and hold PROG/RESET then RUN (just like for [1X] mode), then hold them for about 1 second. The clock LED will blink twice for enabled and flicker briefly for disabled.
CLOCK OUT (Internal)
Purpose
Send the internal clock out the ACC jack.
Default
Disabled / Off
Operation
Press and hold PROG/RESET, then ACC and hold for 1 second. The ACC LED will BLINK twice to let you know that CLOCK OUT is enabled and will FLICKER when it has been disabled.
Important Notes:
ACC will no longer be sent out this jack, but it can still be programmed into sequences. The ACC jack will still operate normally when using an external clock.
CHANGE ON CLOCK MODE
Purpose
Normally if the 3650 is running and you select a new song or sequence to play, it waits until the current one has completed before switching to the new one. You can change this so that the song or sequence is switched on the next clock by enabling CHANGE ON CLOCK mode.
Default
Disabled / Off
Operation
To enable this mode, press and hold PROG/RESET, then STEP UP, then hold both buttons for 1 second. STEP #15 LED will blink twice for enabled and flicker for disabled.
APPENDIX
LED STATES
Throughout this manual, we will refer to the following four “states” of an LED light:
Off
Not lit
On
Lit continuously (steady)
Blink
Flashing on & off about 4 times per second
Flicker
Flashing on & off very rapidly
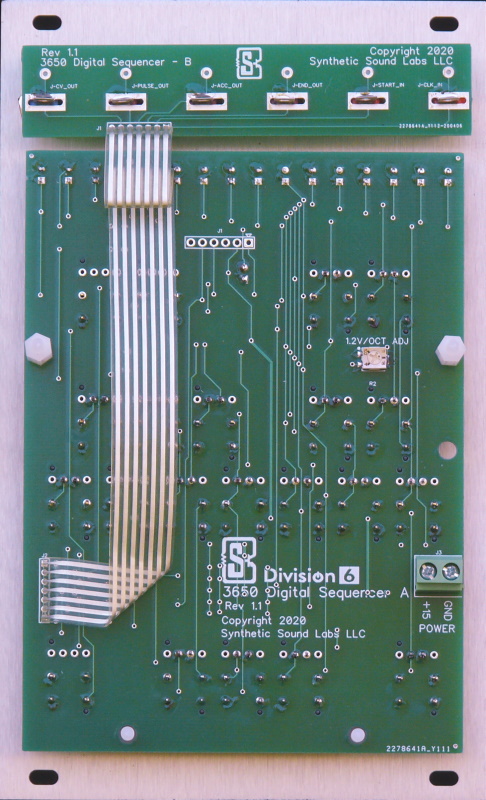
CALIBRATION
You can use the trim pot on the rear of the module to calibrate the sequencer to 1.2 volts per octave. You will need a small jeweler’s screwdriver, either Philips or flat blade will do. The blade should fit comfortably into the trim pot’s plastic adjustment to prevent damage.
CAUTION – You will need to remove the module from your rack while doing calibration, which means that you must ensure that the module is safely isolated from short circuits. Laying the module on a cloth towel is a good method. There are no dangerous voltages connected directly to the module, but there may be other safety concerns within your rack that we cannot advise you on.
Though you shouldn’t have any problems if you are careful – YOU AGREE TO PERFORM THIS PROCEDURE ENTIRELY AT YOUR OWN RISK !!!
Procedure:
Connect a voltmeter to the CV OUT jack of the sequencer you want to calibrate
Press RESET to make sure the sequencer is in Ready or Program mode (either will work)
Press the OCTAVE UP button a few times to set the keyboard to the highest octave (OCTAVE UP LED ON steady)
Press the NOTE C button
Adjust the trim pot until the meter reads as close to 4.800V as you can get it
Check the C notes on the lower octaves by pressing the OCTAVE DOWN then NOTE C buttons. Each one should be an even voltage. If not, adjust the trim pot until they are as close as possible. Remember that Buchla uses 1.2V per Octave.C4 (Highest Octave) 800V
C3 (Higher Octave) 3.600V
C2 (Middle Octave) 2.400V
C1 (Lower Octave) 1.200V
C0 (Lowest Octave) 0.000V
The outputs of the sequencer are buffered, so they should maintain their voltages even when loaded down by another module. You may find, however, that the standard calibration doesn’t work with certain modules. In this case, you can use the trim pot to adjust the calibration so that it is correct for your module.
FACTORY RESET
If something goes terribly wrong or you simply want to wipe out your stored sequences and songs. Press and hold the black C# and D# keys while you power up your synthesizer and wait for the light show to complete once. You WILL lose all your songs and sequences!
Copyrights & Trademarks
This document is copyright 2020 by Synthetic Sound Labs LLC. Firmware by Division-6.
Buchla is a trademark of Buchla & Associates, Berkeley CA.


Reviews
There are no reviews yet